
This post contains affiliate links. If you make a purchase through these links, I can earn a commission at no extra cost to you. Thank you!
Are you wondering about using Grab in Indonesia? So was I.
As a solo female traveler, navigating a new country can feel overwhelming, especially when it comes to getting around safely and efficiently.
During my travels through Indonesia, one app has made a huge difference in easing those concerns: Grab. Whether I was in the busy streets of Jakarta, the beach towns of Bali, or the spiritual heart of Ubud, Grab gave me the freedom to explore on my own without the stress of figuring out local transport.
In this post, I’m breaking down everything you need to know about using Grab in Indonesia so you can travel with confidence too.
Table of Contents
Downloading and Setting Up the Grab App
First things first, make sure you have the Grab app downloaded on your phone.
Once downloaded, open the app and sign up using your phone number. You’ll get a verification code sent to your phone, which you need to enter into the app to complete the registration.
The installation is pretty straightforward and takes just a few minutes. Just make sure you have everything set up and ready to go before you get to Indonesia.
Using the Grab App
The Grab app is really easy to use and functions pretty much the same way that Uber does in the US. You can set the language too so don’t worry about not being able to understand Bahasa.
Here’s a quick rundown of the main features.
The Top Bar of the Home Screen
The top of the home screen displays icons for different services Grab offers: GrabBike, GrabFood, GrabCar, GrabMart, and more.
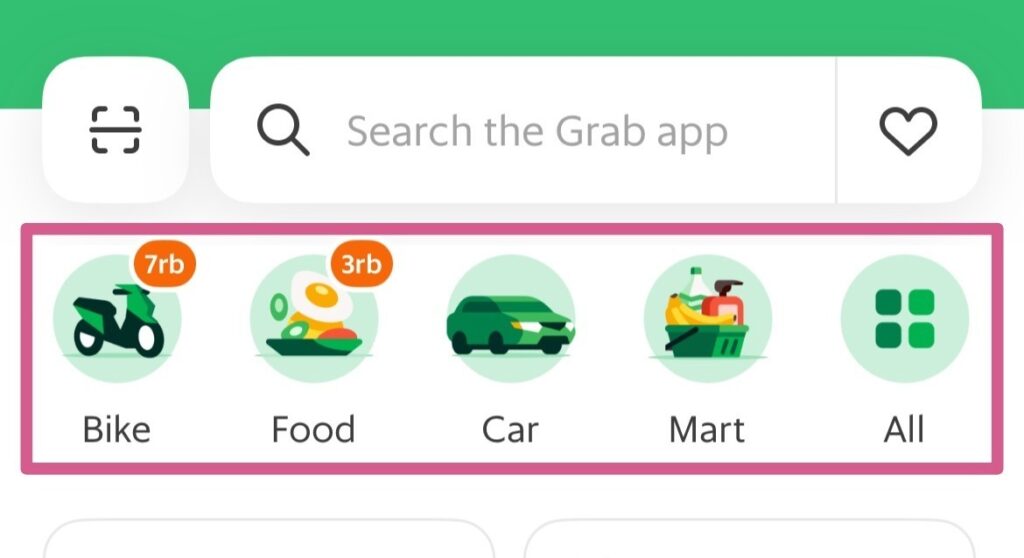
Grab Bike
Booking GrabBike is to ride on the back of a motor scooter. Although this will be the cheapest option, I’ve not summoned up enough courage to use GrabBike yet. Traffic is insane and the motor bikes are notorious for weaving through traffic and squeezing into the tiniest of spaces just to get in front.
Grab Food
When you’re craving McDonalds but don’t want to leave your accommodation, GrabFood will deliver it, or any other food, right to you.
Grab Car
GrabCar is your go-to for pretty much all of your short, local rides through town. Car options usually include economy and plus/premium comfort levels. All of the cars I’ve used, including economy, have all been clean, in good repair, and with functioning seatbelts. No concerns whatsoever.
Grab Mart
Use GrabMart for on-demand grocery and essentials delivery. Whether you need snacks or a new bottle of shampoo, GrabMart will deliver them to you.
The Bottom Bar of the Home Screen
On the bottom bar of the app there are links to Home, Activity, Payment, Messages, and Account.
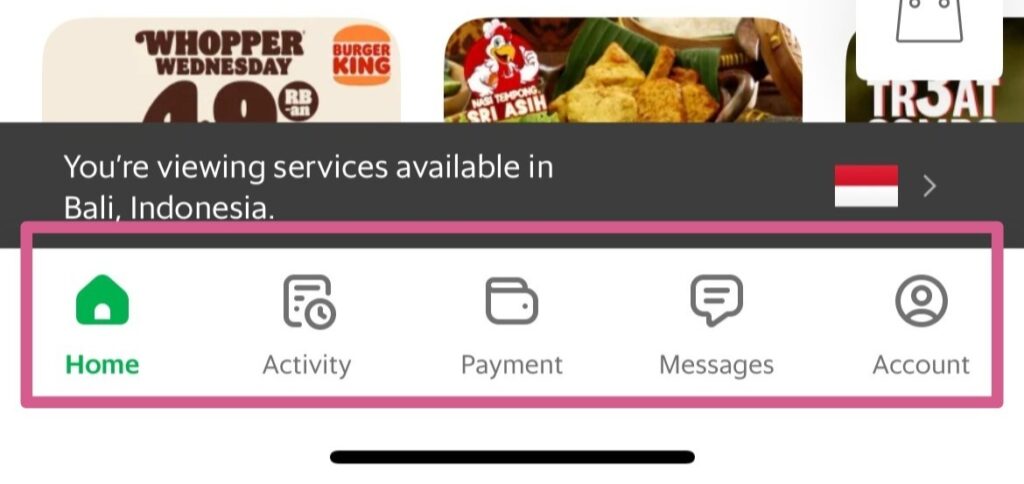
Activity
Go to the Activity section to find your recent and past rides and deliveries.
Payment
Payment is where all the receipts for your transactions are kept.
Messages
The Message section is used for messaging Customer Support.
If you need to message your driver, you’ll be able to do that directly from the booking screen when your driver is confirmed.
Account
The Account button manages all of your settings. This is where you link your credit card, add in up to three emergency contacts, change the language, and update your security settings.
It’s important to check your account settings after you download the app. You want to have it all set up correctly before you leave so you don’t have to do it when you’re there.
Booking Your Ride
Okay, now that we’ve gone over the different buttons on the Grab app, and you’ve checked your settings, let’s get to how you book a ride.
Start by tapping the ‘Car’ icon on the home screen. This will take you to the section where you can enter your destination in the ‘Where to?’ bar at the top of the screen.
Enter Your Destination
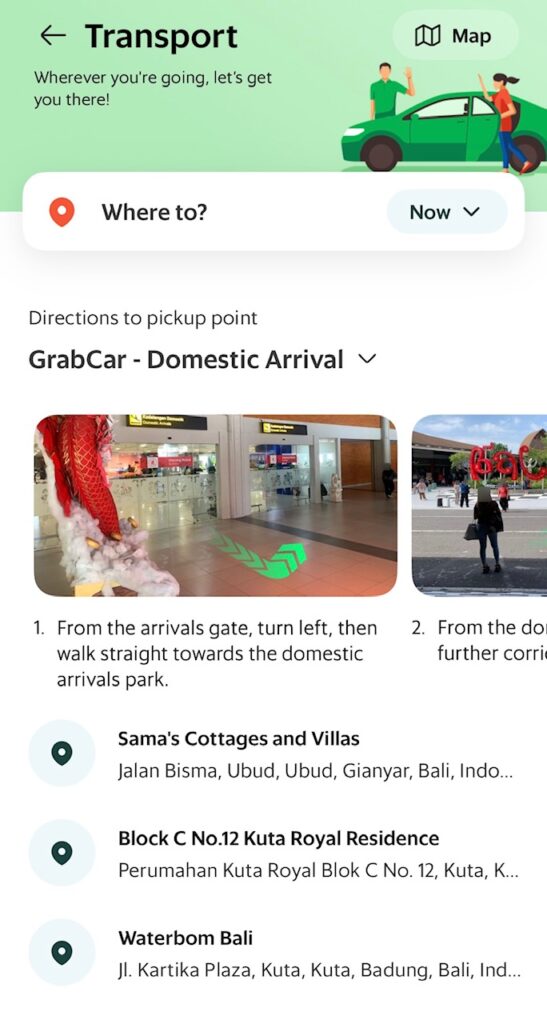
When entering in your destination, just start typing in the address or name of the place you are going to. As you type, Grab will try to determine where you are going and show you potential matches. Once you see your destination, tap on it.
If you’ve previously searched for a destination, it will show up in a list underneath. You could choose your destination from the list if you see it in there.
My destination is Sama’s Cottages and Villas in Ubud which you can see in the previously searched list.
Enter Your Pickup Location
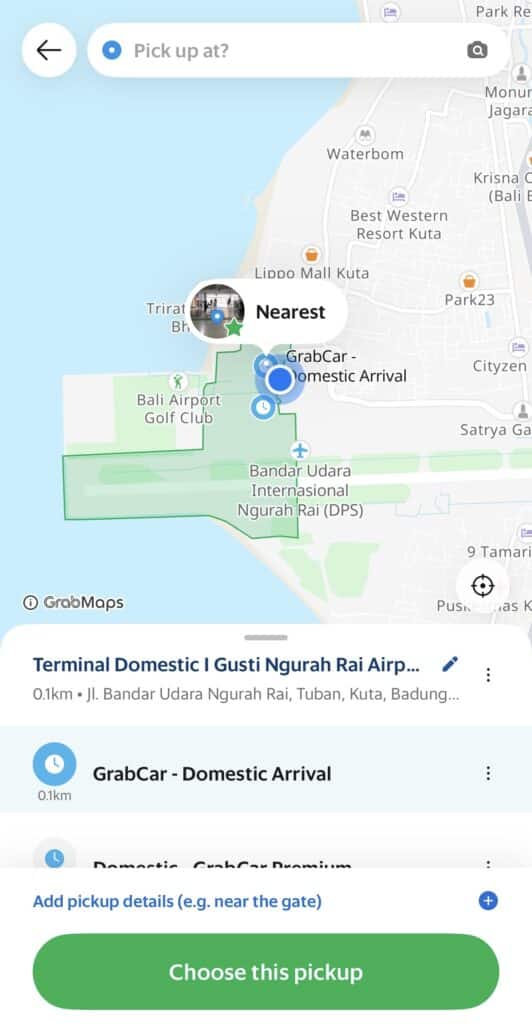
After entering your destination, the app will prompt you to enter your pickup location. By default, it suggests your current location.
You can see that my current location is the Domestic Arrival Terminal of the Bali Airport (DPS).
If you need to change your pick-up location, just click and drag the map so that your “pin” is in the correct location.
You can also type in the pickup location in the ‘Pick up at?’ bar at the top of the screen.
Once everything looks good, tap the green ‘Choose this pickup’ button at the bottom of the screen to continue.
Check the Fare and Confirm
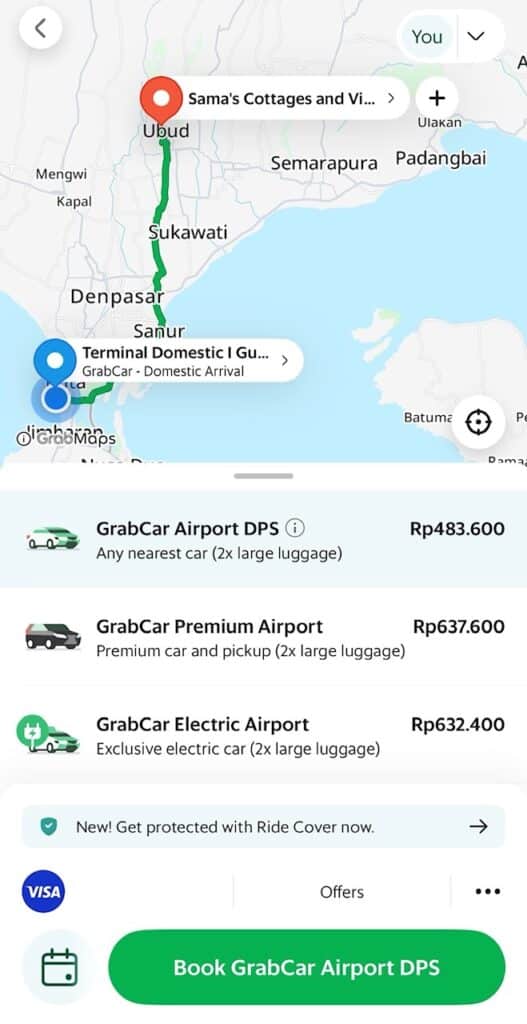
Next, you’ll see the cost for your ride. If you’re satisfied with the price, tap ‘Book’ and wait for a driver to accept your ride. Once Grab has found a driver, you’ll see their details, including name, photo, vehicle type, and license plate number.
If you look at the screenshot above, you can see that the ride from the Bali Airport to Sama’s Cottages in Ubud will cost me Rp483,600 which is about $29.
Track Your Driver
After booking your Grab ride, you can track your driver’s location in real-time. This feature is incredibly useful, especially when you’re in a busy area. You’ll see an estimated arrival time, giving you an idea of how long you’ll need to wait.
Confirm Your Vehicle
When your driver arrives, they will confirm your name and destination.
Before getting into the car, look at the vehicle type, color, and license plate number to make sure they match what’s shown on your app.
If things don’t match up, don’t get in the car. You may have to pay a cancellation fee but safety always comes first. Thankfully, everything has always matched up for me so I’ve not run into that issue.

About Grab Drivers
All of the Grab drivers I’ve had were friendly and professional, and many spoke basic English. There were only a couple of times I had a driver with limited English and they just used a translation app to communicate so I never ran into any issues communicating.
Some of my Grab drivers were also happy to share their recommendations for things to see or places to eat. So don’t be afraid to ask.
Paying for Grab
Once you reach your destination, the fare will be automatically deducted from your linked credit card.
To pay in cash, you need to choose cash payment when you first book your ride. Grab drivers don’t carry a lot of cash though, so keep that in mind when paying, and try to get as close to the exact amount as possible. They may not have change to give back to you.
Paying Tolls with Grab
Toll costs are generally not included in the fare shown on the Grab app. Instead, they are added to the final fare at the end of the ride.
Here’s how it works:
During the ride, if your route involves toll roads, your driver will ask if you have cash to pay. I always tell the driver no and that I want them to pay.
They will swipe their e-toll card to pay for the toll. An e-toll card is similar to a prepaid toll card in the US.
The cost of the toll will be added to your total fare at the end of the trip, and this adjusted amount will be charged to your payment method or collected in cash, if that’s your chosen payment method.
Is Using Grab in Indonesia Safe?
Of all the dozens of times I’ve been in Grab, I always felt safe. I found it no different than using Uber. As long as you follow common sense precautions, like verifying you’re getting in the right car, you should be fine.
There are also features built into the Grab app to help keep you safe.
Share Your Ride
One of the best features is the ability to share your ride details with friends or family, no matter where they live. Tap the ‘Share My Ride’ button to send your trip information via SMS and have them follow you in real time.
Emergency Assistance
In case of an emergency, Grab has an in-app emergency button that connects you directly to local authorities. I’ve never had to use the emergency button but it’s nice to know help is just a tap away.

Tips for Using Grab in Indonesia
Like I’ve said, using Grab is very much like using Uber in the US. There are a few helpful tips though that will help you have a smoother experience.
Download Before You Arrive
Make sure to download and set up the Grab app before you arrive in Indonesia. This way, you can hit the ground running as soon as you land, especially if you need a ride from the airport.
Use Landmarks as Pickup Points
When booking a ride, using well-known landmarks as your pickup location can help avoid confusion. If you’re staying at a large hotel or near a famous site, select that as your pickup point.
Language Barrier
While many Grab drivers speak basic English, drivers are pretty good at using Google translate or similar to communicate.
Tipping Your Driver
It’s most convenient to leave a tip through the app after your ride. However, you can also give the driver cash if you prefer. A suggested tip amount is around 10,000 to 20,000 IDR, depending on the length and quality of the ride.
Messaging Your Driver
One handy feature of Grab is the in-app messaging system. You can message your driver directly to clarify any details or provide additional instructions. I always send a picture of myself and where I’m waiting to help avoid any confusion with pick-up location.
Wrong Pickup Locations
Sometimes, your driver might need to pick you up across the street from your specified location due to traffic or road conditions.
There were a couple of times in Jakarta that I had requested to be picked up at the Catholic Cathedral. Instead, because of it being a one-way road, the driver stopped across the street at the Istiqlal Mosque and waited for me to cross the street. In hindsight, messaging the driver specifically to pick me up at the Cathedral may have helped.
Grab vs Gojek
In Indonesia, Grab’s main competitor is Gojek. They are pretty much the same thing. It’s like Uber and Lyft in the United States. Both apps have multiple payment methods, safety features, and user-friendly interfaces. I have always used Grab so I can’t speak to what it’s like to use Gojek.
Bluebird Taxi
If you prefer taking a taxi to get around, Bluebird Taxi is the most trusted traditional taxi service in Indonesia. You can book a Bluebird Taxi through their app or by flagging one down on the street.
Bluebird is the most recommended taxi in Indonesia. Other taxi companies know that though and will try and pass their “blue” taxi off as Bluebird. Don’t fall for it. Make sure you are getting into a legitimate Bluebird taxi by checking the name and logo.
Grab in Southeast Asia
Grab isn’t just in Indonesia. It’s in several Southeast Asian countries including Thailand, Malaysia, Singapore, Vietnam, Myanmar, Cambodia, and the Philippines.
The same Grab app works in each of the countries. All you need to do is go into your settings and change the country.
Some countries may even have different features specific to the area. For example, in Thailand, you can request a female driver! I try to choose this option when I’m in Thailand. It just gives me a little more peace of mind and makes me feel more comfortable.
Final Thoughts
Using Grab in Indonesia has made my solo travels so much easier and safer. Whether I needed a quick ride across town or dinner after a long day of exploring, Grab has consistently come through for me.
It’s user-friendly, reliable, and gives me peace of mind, which is exactly what I look for as a solo female traveler.
I hope this guide helps you feel more confident using Grab on your own trip to Indonesia. Once you get the hang of it, you’ll wonder how you ever traveled without it.